


In today’s connected world, security is paramount for any web application handling user data. Proper authentication and authorization controls are essential to keep user information safe from compromise.
In the previous article we started a simple web application project and went through the process of getting it set up with OAuth authentication. In this article, we’ll explore several techniques to secure your web applications by building on the OAuth implementation from the previous tutorial.
In this article we will cover:
Issuing JWTs for refresh and access token based authentication.
Refreshing JWT access tokens to prevent expiration pitfalls.
Persisting login state beyond a single session using a long lasting refresh token cookie.
Used together properly, these methods will enhance our web application security leveraging the same technology used by major OAuth providers. We’ll expand on the initial OAuth integration with reusable patterns for authentication, tokenized sessions, and seamless refresh workflows.
By the end, you’ll understand the benefits of using tokens and have code snippets to implement robust authorization in your own apps. Let’s dive in!
Tokens
In our previous tutorial, we created a simple session cookie containing the user’s username after authorizing the user with Google OAuth. However, this approach has security risks in practice. Cookies can be vulnerable to manipulation or theft, so storing sensitive user data in them is not advisable.

JSON Web Tokens (JWTs)
Rather than using variables as cookies directly, a more secure solution is to leverage JSON Web Tokens (JWTs). JWTs allow for transmitting of verified user information like username, roles, and permissions between client and server in a signed, tamper-proof way. JWTs are signed with a secret signature which prevents contents from being altered, unlike a standard cookie.
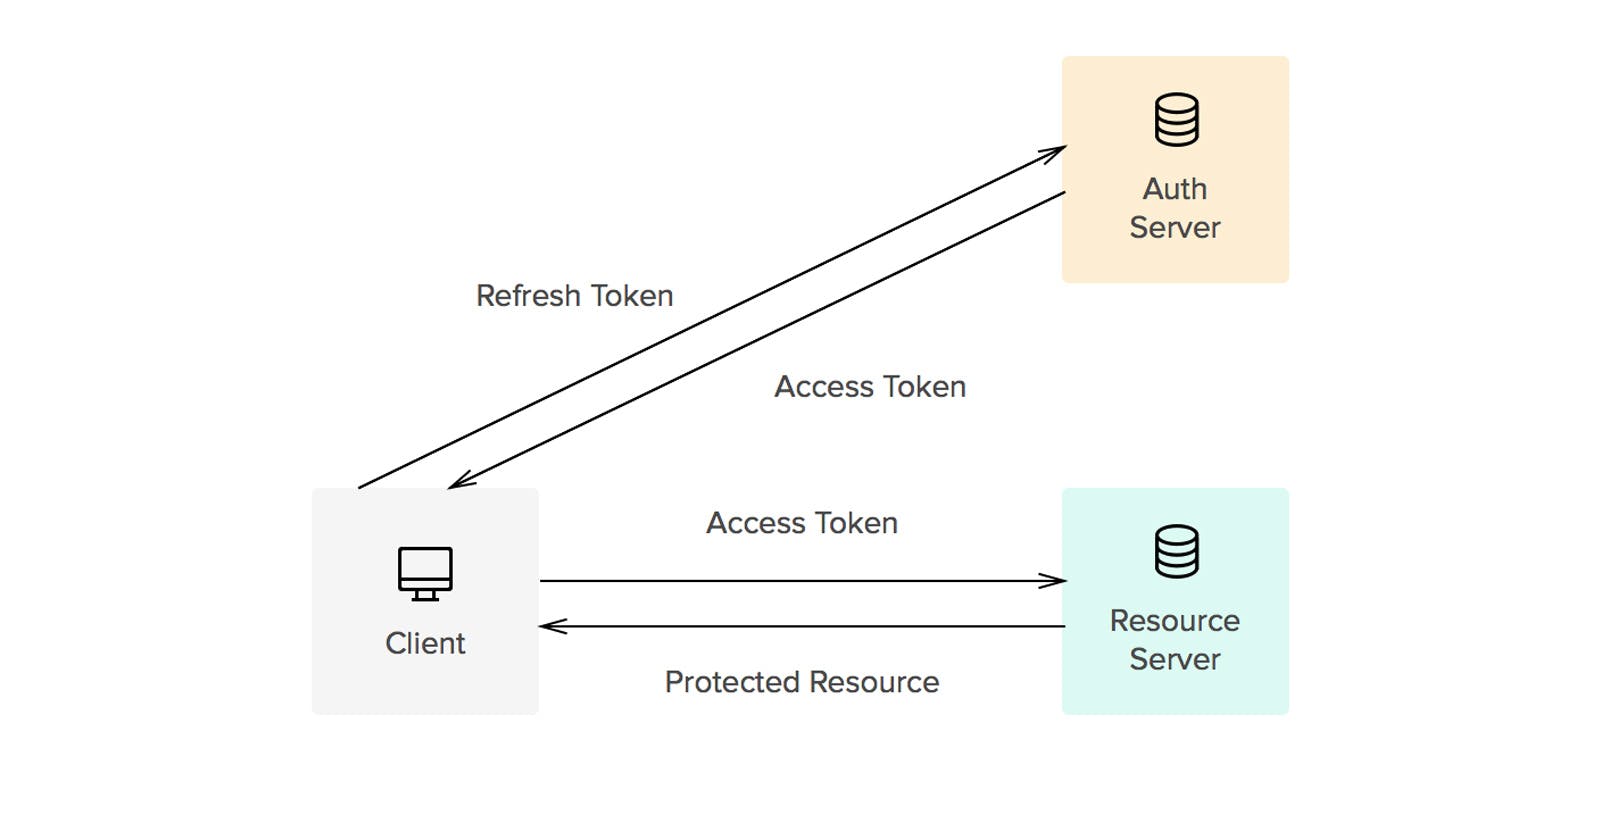
To ensure our application is secure, we will make use of two tokens, a refresh and an access token.
Refresh Token:
Refresh tokens are longer lived credentials used exclusively to get new access tokens when they expire. These are used to retrieve a new access token so users are not bothered to log in again after initial authorization is granted.
Access Tokens:
Access tokens are short-lived credentials that allow accessing protected resources. They expire frequently. The tokens allow apps to directly access resources on the user’s behalf without re-authenticating every time. These also provide flexible access control by storing information like scopes or roles.
Persisted Login
Together, these tokens strike a balance between security and convenience where access tokens provide short term access while limiting damage if leaked, and refresh tokens allow retaining overall access without re-prompting the user to log in.
Since the refresh tokens have a much longer expiration time, we can save that token as a cookie, similarly to how we set the username cookie in the previous article. However, this time we will set the expiration of the cookie to match the expiration of the refresh token. Where as previously we set the username as a session cookie which automatically gets deleted when the session is over (browser is closed), this cookie will remain until the expiration date/time or the user manually clears cookies.
Once our application can retrieve the refresh token, we can then use it to request an access token from our server. This token can then be stored in a variety of ways but for the purpose of this tutorial we will save it as a local state variable. This means that when we refresh our page, the access token will no longer be accessible to our web application and we will need to request another one from our server using the same refresh token.
Implementation — Refresh Token
Starter Code
To follow along with the implementation below you can begin with the boilerplate code found here. This includes the work we completed in the previous article for setting up the Google OAuth authentication.
To create our refresh token, we return to the index.js in our server folder where we have our api/oauth route. We can remove the line that sets the username cookie as we won’t be needing this anymore.
Instead, we will replace this with our refresh token. To create our refresh token, we must first install the jsonwebtoken library using ‘npm i jsonwebtoken’ and also import jwt from this library at the top of our file.
import jwt from 'jsonwebtoken'
Next we build our refresh token by using the sign method from the jwt library passing in the following:
Payload: An object with any information we want the token to store. In our case we will only include the users name since refresh tokens aren’t meant to store much information.
Secret: We can pass our refresh_token_secret which we save in our .env file. This secret will help keep our token from being manipulated/altered without our knowledge.
Options: Here we can include an object of options such as algorithm, expiresin, issuer, audience, etc. We will only include an expiresin option to give our token an expiration datetime of 90 days
  const refreshToken = jwt.sign(
   {
    username: googleUser.given_name,
   },
   process.env.REFRESH_TOKEN_SECRET,
   { expiresIn: "90d" }
  );
Now that we have our refresh token, we can set up our cookie options since this cookie will be a little more complex than the original cookie we created with the username.
maxAge: This sets the expiration of the cookie and in our case should match the expiration of the token. This field is set in milliseconds so we will use 7.776e9 as our value
httpOnly: Prevents client-side JavaScript from accessing the cookie. This helps mitigate XSS attacks where malicious scripts try to steal the cookie content. The cookie can only be transmitted via HTTP requests. To read more about this, check out the Mozilla documentation here. We will set ours to true since we don’t need access to this in our front-end javascript to improve security.
domain: Sets the domain the cookie is valid for. This should be your production domain name when deploying.
path: Sets the URL path the cookie is valid for. Using ‘/’ makes it available site-wide.
sameSite: Restricts when the cookie gets sent in cross-site requests. This helps prevent CSRF attacks by limiting when the cookie can be used from external sites. There are different values to tailor the policy strictness. We will use ‘strict’ to prevent cookies from being sent on cross-site requests though lax, none are options as well depending on your use case.
secure: Requires the cookie only be sent over HTTPS connections. This prevents man-in-the-middle attacks from intercepting the cookie over unencrypted HTTP. The cookie is always encrypted in transit. For our application since we’re not using HTTPS we will leave this as false.
 const refreshTokenCookieOptions = {
   maxAge: 7.776e9,
   httpOnly: true,
   domain: "localhost",
   path: "/",
   sameSite: "strict",
   secure: false,
  };
With the cookie options ready, we can now set the cookie similarly to when we created the username cookie but this time we include the options
res.cookie("refreshToken", refreshToken, refreshTokenCookieOptions);
If you run your app now and log in with Google you may notice that the app no longer welcomes you back. This is because our app was set to allow access based on the username cookie which is no longer provided. To handle this next piece we’ll move on the creating and fetching an access token.
Implementation — Access Token
Client Side Code
As noted above, the purpose of the refresh token is to help us get our access token. This can be done by making an http request to our server to retrieve an access token given our refresh token.
You may recall that when we created our refresh token, we set the httpOnly flag to be true, meaning that we cannot directly retrieve the refresh token the way we did with the username cookie. Instead we will set our http request to include credentials which will pass the refresh token along with the request.
We revisit the App.jsx file in our client side code where we had our useEffect which retrieved our user cookie. We can replace the code in this useEffect with the code below to retrieve our access token:
const getAccessToken = async() => {
  try{
    const retrievedAccessToken = (
      await axios.get('api/getAccessToken',
      {withCredentials:true})
    ).data

    setAccessToken(retrievedAccessToken)
    setUser(jwtDecode(retrievedAccessToken).username)
    setIsLoading(false)
  } catch (err){
    const errorCode = err.response.status
    if (errorCode !== 401){
      alert(err)
    }

    setIsLoading(false)
  }
}

getAccessToken()
Since making an http request is an asynchronous operation, we need to create an async function for our useEffect to call. Our getAccessToken function is wrapped in a try catch block to help us catch potential errors.
You may have noticed the that once we retrieve the access token from our server, we update two new local state variables, accessToken and isLoading. While the accessToken state variable is self explanatory, we need isLoading since we are performing this important asynchronous operation on component mount. This will help us hold off on displaying anything until our operation is complete and we know if we were able to retrieve an access token. You can add the state with the below:
const [accessToken, setAccessToken] = useState('')
const [isLoading, setIsLoading] = useState(true)
Our function also updates the user state variable with the username we expect to be returned inside of the access token. All JWTs are created using base64 encoding so in order to read the values from our token we will need to decode it. This can be done by installing the ‘jwt-decode’ library and using the jwtDecode function as shown in the getAccessToken function above. Make sure to also import jwtDecode from ‘jwt-decode’
Within the catch block of our getAccessToken function, we check for the error code in the response and if it’s not error code 401, we will alert the user of the error. Typically you would want to develop some error handling for this but to keep things simple in this project we will just throw an alert.
The 401 error code here is very important because this resembles an ‘unauthenticated’ error response. If we make our request to the server for an access token and we don’t provide a refresh token, we should expect a 401 error to be thrown to tell our application that we have not yet logged in. In this case, we simply update the isLoading state variable to false without updating our user variable.
Finally, we want to add a very basic ‘loading’ note to display to users while getAccessToken is running. This can be done just above the main return using an if statement to return the loading display:
if (isLoading) return <><h2>Loading</h2></>
Before we move on to the server side code, we need to update our handleLogout function to remove the refreshToken cookie as well as update the accessToken state. Our revised handleLogout function should now look as follows:
const handleLogout = async () => {
    await axios.post('api/logout')
    setUser('')
    setAccessToken('')
  }
Server Side Code
If you run this code, you should get an alert with a 404 error which makes sense since we haven’t created the getAccessToken route on our server just yet. To solve this, we’ll now pivot to our server side code on the index.js file in your server folder.
Here we’re going to add a new route to get our access token and set it up with a try catch block.
app.get('/api/getAccesstoken', async (req,res) => {
  try {

  } catch (err){
    res.status(500).json({error: err.message})
  }
}
The purpose of this route is to return an access token IF we have a valid refresh token included in our request. We must start by extracting the cookies from the request to see if the refresh token exists. To do this, you can grab the cookies from the request header and loop through the included cookies to get the key value pairs.
const cookies = {}

const cookiesArray = req?.headers?.cookie?.split(';')

cookiesArray?.forEach((cookie) => {
 const [key, value] = cookie.trim().split('=')
 cookies[key] = value
})
Once we have the cookies, we need to check to see if the refresh token is included. If not, we will return an 401 error to let the client know that we are not logged in.
if (!cookies.refreshToken){
  res.status(401).send({message: 'No refresh token found'})
  return
}
If our code has gotten past this step, it means that we did in fact include a refresh token in our request. Now we need to confirm that this token was created by us and has not been tampered with. This can be done by using the verify method from the jsonwebtoken library which decodes the token for us if the signature is valid. To confirm the signature validity, we also pass in our refresh token secret.
const refreshToken = jwt.verify(
  cookies.refreshToken,
  process.env.REFRESH_TOKEN_SECRET
)
If the verification fails, we will be taken to our catch block where we can handle the error. The error message we expect from this is ‘invalid token’ so we can have a conditional listen for this error where we will clear the refresh token cookie from the client to prevent additional requests with the tampered cookie and return a 401 error.
if (err.message === 'invalid token'){
 res.clearCookie("refreshToken", { domain: "localhost", path: "/" })
 res.status(401).json({error: err.message})
 return
}
Finally if we’ve made it all the way past verifying the refresh token, we can now go ahead and generate an access token. This can be done similarly to how we created the refresh token previously except this time we’ll use the access token secret and set the expiration time to be in 5 minutes
const accessToken = jwt.sign(
 {
   username: refreshToken.username,
 },
 process.env.ACCESS_TOKEN_SECRET,
 { expiresIn: "5m" }
);
Once we have this token created, we can then return it to our client so the user can be logged in.
res.send(accessToken)
Next we need to create our logout route which will for now simply clear the refresh token from the client to ensure getAccessToken doesn’t have a refresh token to process. We should use a POST request for this as POSTs are often used for action requests even if we’re not creating new records for a db. We’ll set up a basic try/catch block for now which we’ll revisit later. The 204
app.post('/api/logout', async (req, res) => {
 try {
  res.clearCookie("refreshToken", { domain: "localhost", path: "/" })
  res.status(204).end();
 } catch (err) {
  res.status(500).json({error: err.message})
 }
})
Bonus: Refresh Token Rotation
While the use of JWTs and HTTPOnly cookies significantly improves the security of our application, there is a still a small chance that nefarious users may be able to obtain our tokens. As access tokens have a very short lifespan, this isn’t too much of a concern. However refresh tokens can have very lengthy expiration times (or even never expire) which makes them prime candidates for malicious use.
Refresh token rotation is a security practice where a new refresh token is issued every time a refresh token is used to obtain a new access token.
By simply issuing a new refresh token with every access token, we’re able to limit the lifetime of the refresh token which reduces the window of vulnerability in the event that it gets compromised. It also allows for explicitly revoking access by invalidating a stolen refresh token after rotation (a concept we’ll explore in the next article).
See if you can implement this bonus feature on your own. Hint: no need to reinvent the wheel, you already created a refresh token so see if you can reuse this code.
Recap
If you followed the steps above, you should now have successfully implemented a web authentication system that leverages Google OAuth along with refresh and access tokens to allow for persisted login.
Let’s recap some of today’s concepts and methods:
JSON Web Tokens (JWT): Provide much greater safety for our web applications by requiring to be signed with secret keys helping prevent tampering and manipulation
Refresh Tokens: Long lasting JWTs that are usually stored as cookies on the client with the main purpose of being used to generate access tokens. These tokens are set to be HTTPOnly cookies preventing them from being accessible via the client but able to be attached to outgoing HTTP requests.
Access Tokens: Short lived JWTs that are generated and used in the client side code to determine user access and privileges. These tokens can only be generated when there is a valid refresh token available.
Persisted Login: By leveraging the expiration of the refresh token cookie in the client browser, we retain the refresh token even after the browser is closed. This allows our web application to request an access token on startup and if a valid refresh token is present, we can generate an access token without requiring the user to re-log in.
Refresh Token Rotation: As our refresh tokens usually have a long expiration time, we can create a new refresh token every time we need to generate an access token. This technique helps decrease the risks of malicious use of a leaked refresh token while at the same time still enabling our application to use a persisted login pattern.
Next Steps
While we’ve come a long way in securing our web applications, there are a few other practices we can introduce to make our applications more flexible. Keep an eye out for the next article where we’ll introduce the use of a database which will be useful to achieve the following:
Creating a record for a user which can then be connected to valuable information we would like to store for the user (i.e. transaction history, favorites, etc)
Creating a single user for different OAuth providers (i.e. signing in with Google or LinkedIn points to the same user)
Ability to explicitly revoke access by invalidating revoked refresh tokens
If you found this article useful and would like to see more, please feel free to reach out with questions and content suggestions.