

Securing Your Web Applications — Getting Started with OAuth Authentication
Building a simple web application using OAuth with Google


In recent years, many websites and applications provide the option to sign in using existing accounts you’ve created with companies like Google, Apple, or LinkedIn. This simplified sign-in process enhances the user experience by allowing customers to leverage their existing credentials rather than create new ones. Ever wonder how that actually works behind the scenes? It’s powered by a protocol called OAuth. OAuth enables you to authorize apps to access your data on other sites without exposing your credentials.

In this article, we’ll dive into OAuth step-by-step. We’ll build both the front-end and back-end logic to add “Sign in with Google” functionality to a web app using their OAuth services.
Here’s what you’ll learn by the end of this article:
How OAuth establishes trust between your app, the user, and Google’s servers
The specific OAuth workflow to enable Google sign-in and access authorization
How to implement OAuth on the front-end with sign-in buttons and redirects
Back-end integration for exchanging tokens and calling Google APIs
By the end, you’ll understand the magic behind logging in with Google or other providers. And you’ll have the code to allow secure sign-in and access delegation using a major OAuth platform.
Let’s get started integrating the future of authentication!
What is OAuth?
OAuth is an open standard for access delegation that allows users to grant limited access to their resources on one site to another application without sharing their passwords.
It uses authorization tokens instead of credentials to grant applications access to specific resources. OAuth establishes trust between the user, client app, and authorization server to enable this delegated authorization flow in a secure way.
Why Use OAuth
Allows access to user resources without compromising passwords
Users can grant limited access without giving full control
Decentralizes authentication through tokens
Used across major platforms like Facebook and Google
Industry standard for authorization delegation
If you’d like to take a deeper dive into what OAuth is and how it work, check out this article here.
Getting Started
We’ll be using React + Vite on the front-end along with Node + Express on the backend for this project. We’ll move forward with this project under the assumption that you have some experience with these technologies.
Starter Code
To get started with this project, you can clone the oauth-boilerplate starter code found on github here. Once cloned, enter the boilerplate directory and npm i in your terminal to install all of the necessary dependencies. Running npm run dev will start up the application and if you open up http://localhost:3000/ in your browser you should now see the below screen:
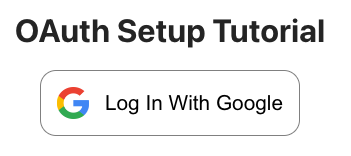
This will be our starting point for the project. The starter code sets up our express server along with the simple landing page found in the App.jsx file.
Setting Up A Google Project
In order to allow users to sign in using their Google credentials, we need to first set up a Google Project which will be associated with our web application.
Begin by going to your Google Cloud homepage found here.
Click the Select Project dropdown to open the project modal. If you have not created any projects yet, this list will be empty. For this project, you can click the New Project button to get started.

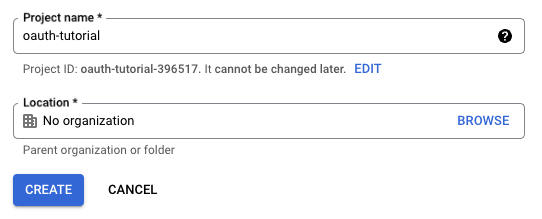
Next enter a name for your project, for this one I just called mine ‘oauth-tutorial’. You don’t need to add an organization to this project since we’re only using this for demonstration purposes.
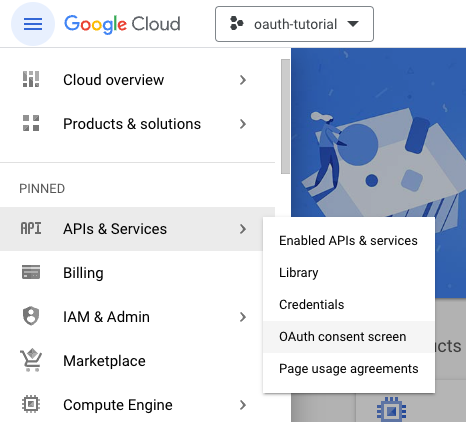
Once the project is created, you can enter the project by selecting the project from the Select Project dropdown. Open the menu on the left and click on the APIs & Services -> OAuth consent screen link.
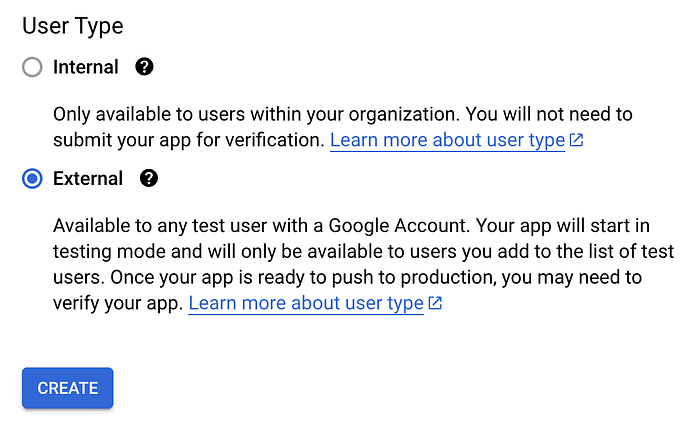
On the initial Oauth consent screen, select External as the user type since we will not be working within an organization. Click CREATE to continue.
Here we will need to add the following:
App Name
User Support Email
Developer Contact Information
App Domain
You can choose any name for your App, I’m calling mine OAuth Tutorial and I’m using my personal email account for both the support and developer contact information emails.
For the App Domain you should use the domain name of your application. If you’re using the boilerplate code provided and running the application locally, you can use http://localhost:3000/
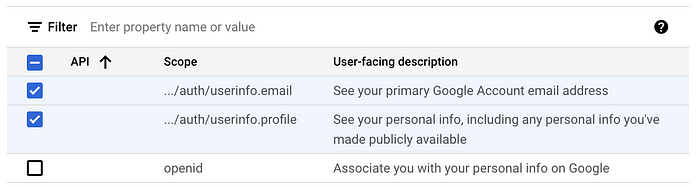
After clicking Save and Continue you will get to the Scope Selection page. This is where you will select the scope of access you will need from your user. This can range widely depending on the purpose and functionality of your application, i.e. if you need access to the users emails, you would select that scope. For this tutorial, we will simply add the userinfo scopes to get the user email address and user profile information. You can do this by clicking Add or Remove Scopes and selecting the two scopes mentioned.
Click the Update button at the bottom to add the scopes followed by Save and Continue to move on to the next page.
On the Test Users page you can add user emails that will be allowed to log in for testing. Here I’m simply adding my own email since I’ll be using this application myself.
Finally save and continue to the summary where you can click the Back to Dashboard button to complete the project setup.
Creating OAuth Client
Once your project has been created, click the Credentials link from the menu on the left top open the credentials dashboard. This is where we will create our OAuth client

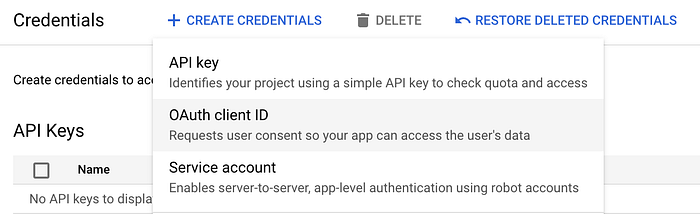
Click the Create Credentials button at the top followed by OAuth client ID.
Here select Web Application for the application type since that’s what we’re building. Give the client ID a name, I will once again be using OAuth Tutorial.
We also need to add Javascript Origins and redirect URIs which will be determined by where the application is being hosted. Since I will only be running these locally, we will use http://localhost:3000 for the Javascript Origins URI and http://localhost:3000/api/oauth for the redirect URI since we will be redirecting the user to the backend once they log in. When you’re ready to publish your application you will need to update this configuration using the domain of your application (i.e. exampleSite.com/api/oauth).
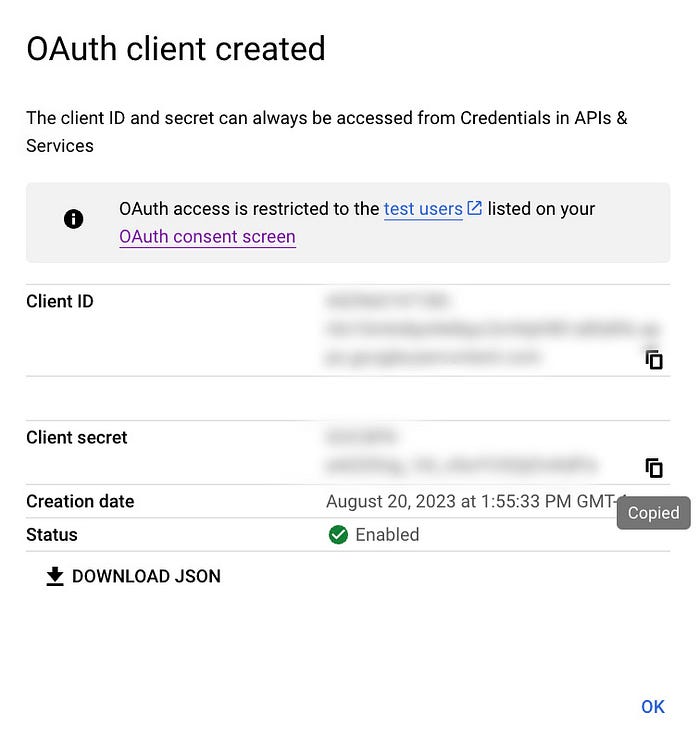
Once ready, click Save to create the client ID. You will see a modal pop up which will include your Client ID as well as your Client Secret. You will need both of these to prove to Google who you are and these must be kept SECRET.
To keep the ID and Secret from getting into the wrong hands, let’s create a new file in our application directory called .env which will hold our environment variables. This file type is treated like a text document and will be omitted from being added to github as we already listed this file in the .gitignore file. While we’re adding these, let’s also add the Redirect URI that we set up above since we will need that as well.
CLIENT_ID='XXXXXXXXXXXXXXXXXXXXXXXXXXXXXX.apps.googleusercontent.com'
CLIENT_SECRET='XXXXXXXXXXXXXXXXXXXXXXXXXXXXXXXXXXXXXXX'
GOOGLE_OAUTH_REDIRECT_URL='http://localhost:3000/api/oauth'
Understanding The Flow
Before getting started on building out our code, let’s examine exactly how the OAuth authentication process will work.
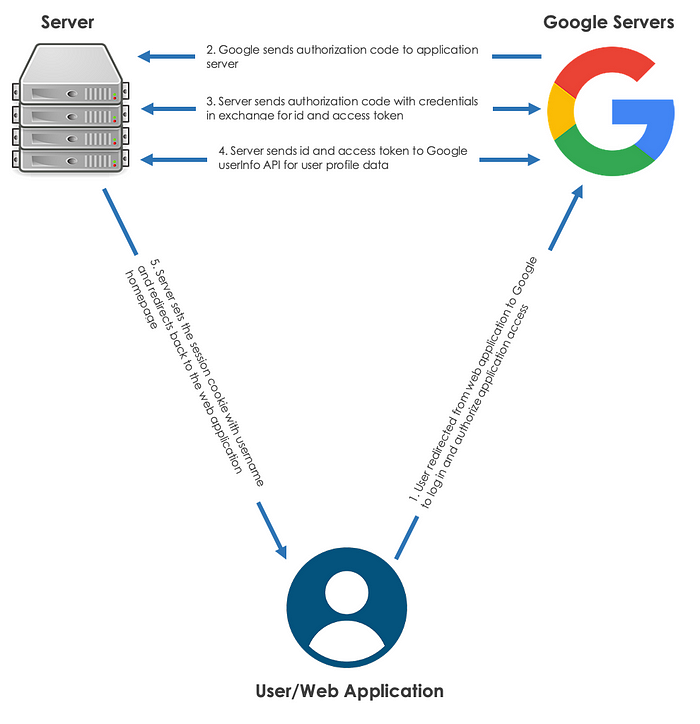
We begin with redirecting the user from our web application to the Google OAuth sign in page which allows the user to securely log in and grant permissions and access for our application
When redirecting, we include certain information to let Google know who we are, what information we are seeking, and where to go once the user has successfully logged in.Upon successful authentication, Google sends an encrypted authorization code to the redirect URI that we provided earlier, in this case it will be to our server. This unique authorization code can now be used to allow us to retrieve information that we have been granted access to (the scopes we requested).
We can now exchange the authorization code, client credentials for ID and access tokens from Google to interface with their APIs.
Using the ID and access tokens we call Google’s user info API and receive the user’s profile data including email, name, ID, photo, etc.
Finally, we save the user’s name in a session cookie and redirect back to the web application front-end. This time when the page opens, it can check for an existing username cookie and if this exists and is valid, the user will be logged in.
Let’s Get Building!
Now with the initial setup out of the way, we can begin building out our OAuth functionality onto the starter code.
Login Button
We’ll start by handling the login button onclick functionality. As we highlighted above, we need to redirect the user to the Google Authentication page. In order to ensure we keep our information secure, we will create our url on the server in the next step. For now, we can just create an Axios get request to retrieve the url from the server and once it’s returned, redirect to the provided url.
const handleLogin = async () => {
    // Retrieve Google Authentication url from the server
    const url = (await axios.get('api/redirectUrl')).data

    // Redirect to the Google Authentication page
    window.location.href = url
  }
Update the handleLogin function in App.jsx with the above. This will now make an asynchronous request to our server to retrieve the Google Authentication url and will wait until the response is returned. Once the url is returned, we redirect the user to log in with Google.
Backend Logic
Now we need to create a route to handle the get request sent from the client when the Login button is clicked.
In the Index.jsx file located in the server folder, add the below code to create the route between before the startUp function is defined.
app.get('/api/redirectUlr', async (req, res) => {

})
Next, we’ll build our url to redirect the user to the correct Google Authorization page utilizing query parameters to pass in our information along with information regarding what we would like returned. The url will need to contain the below parameters:
Redirect URI: This tells Google where to send the authorization code upon a successful login. This must be the same as the redirect URI we registered when setting up our Google OAuth Client
Client ID: Similarly to above, we must include our client ID to identify this app making the request
Access Type: This field determines if we will receive only an access token or also a refresh token from Google. Online results in only receiving an access token while offline gets us a refresh token as well. offline is best for most apps that require ongoing API access, while online can be used for transient short-lived API calls. The refresh token provides flexibility for managing expired access tokens. Since we’re only using OAuth for our initial login, we can set the access type to online where as if we would need regular access to send/receive emails within our app, we would then choose offline.
Response Type: code is the recommended value for security best practices with OAuth 2.0 and OpenID Connect. We can choose other types such as token which returns the access token directly without an intermediary authorization code making it less secure since the token is exposed in the redirect URL.
Prompt: By selecting consent this forces Google to display the consent screen even if the user has previously logged into our application. This is useful information for the user and also allows the user the opportunity to log in with a different Google account than previously used.
Scope: The list of scopes (permissions) your app is requesting access to. Here we are requesting the userinfo.profile and userinfo.email scopes to get the user’s public profile and email address.
NOTE: We are using our environment variables for the redirect_uri and client_id as we need to keep these secret so we never hard code these into our js files.
Add the below into the redirectUrl route:
  const rootUrl = "https://accounts.google.com/o/oauth2/v2/auth";

  const options = {
    redirect_uri: process.env.GOOGLE_OAUTH_REDIRECT_URI,
    client_id: process.env.CLIENT_ID,
    access_type: "online",
    response_type: "code",
    prompt: "consent",
    scope: [
      "https://www.googleapis.com/auth/userinfo.profile",
      "https://www.googleapis.com/auth/userinfo.email",
    ].join(" "),
  };

  const queryString = new URLSearchParams(options).toString();

  const url = `${rootUrl}?${queryString.toString()}`

  res.send(url)
The rootUrl is the Google authentication url where the user will log in while the options object holds our information and used to finally create the query string and complete the entire url.
This url is then passed back to the frontend. Now, by clicking on the Log In With Google button on our homepage, the user will be redirected to the Google Authorization page where they can log in and grant our application access.
After the user is logged in, Google will redirect to our redirect URI which is set up as our server /api/oauth route.
As mentioned above, Google will provide us with an authorization code which we can retrieve using the request:
const code = req.query.code
Next, we need to prepare a request back to Google to exchange the code along with our credentials for the id and access tokens. This is done similarly to the url we created above:
const url = 'https://oauth2.googleapis.com/token';

const options = {
  code,
  client_id: process.env.CLIENT_ID,
  client_secret: process.env.CLIENT_SECRET,
  redirect_uri: process.env.GOOGLE_OAUTH_REDIRECT_URI,
  grant_type: 'authorization_code',
};

const queryString = new URLSearchParams(options);
This time rather than redirecting back to Google, we make an Axios request passing in the url and query parameters. Again, we use our environment variables for the client ID, secret, and redirect URI. The response we expect should include the id and access tokens:
const { id_token, access_token } = (
  await axios.post(url, queryString.toString(), {
    headers: {
      'Content-Type': 'application/x-www-form-urlencoded',
    },
  })
).data;
Now that we have the id and access tokens, we make a call to the Google user profile API to retrieve the user data. We need to pass in the id and access tokens (access as a query parameter and id as an Authorization header key to authenticate our app with Google).
const googleUser = (await axios.get(
  `https://www.googleapis.com/oauth2/v1/userinfo?alt=json&access_token=${access_token}`,
  {
    headers: {
      Authorization: `Bearer ${id_token}`,
    },
  }
)).data;
Finally we can set up a session cookie with the user’s name and then redirect back to the homepage:
res.cookie('username', googleUser.given_name);

res.redirect('http://localhost:3000');
Session cookies are often used to store tokens and other pieces of useful data in the browser which the client has access to. These cookies don’t have a specified expiration date/time so they will be deleted when the session is completed (i.e. browser is closed).
Overall, our backend route should be as follows:
app.get('/api/oauth', async (req, res) => {
  try {
    const code = req.query.code

    const url = 'https://oauth2.googleapis.com/token';

    const options = {
      code,
      client_id: process.env.CLIENT_ID,
      client_secret: process.env.CLIENT_SECRET,
      redirect_uri: process.env.GOOGLE_OAUTH_REDIRECT_URI,
      grant_type: 'authorization_code',
    };

    const queryString = new URLSearchParams(options);

    const { id_token, access_token } = (
      await axios.post(url, queryString.toString(), {
        headers: {
          'Content-Type': 'application/x-www-form-urlencoded',
        },
      })
    ).data;

    const googleUser = (await axios.get(
      `https://www.googleapis.com/oauth2/v1/userinfo?alt=json&access_token=${access_token}`,
      {
         headers: {
           Authorization: `Bearer ${id_token}`,
         },
      }
    )).data;

    res.cookie('username', googleUser.given_name);

    res.redirect('http://localhost:3000');

  } catch (err) {
    res.status(500).json({error: err.message });
  }
});
Finishing Up The Front-End
Now that we have our user cookie set up, we can add some logic for our app to check this cookie on load. If the cookie exists with the user, we will be logged in, otherwise the user will have the opportunity to log in via the login button.
We can achieve this with a simple useEffect that runs on the initial component mount and set the user if the username cookie exists.
useEffect(() => {
  const cookies = document.cookie.split('; ').map(cookie => cookie.split('='))

  const userCookie = cookies.filter(cookie => cookie[0] === 'username')

  if (userCookie.length) setUser(userCookie[0][1])
},[])
Here we retrieve the cookies, search for the username cookie, and finally set the user if the cookie exists.
Lastly we will set up the logout by deleting the username cookie and setting the user back to an empty string. We delete cookies by clearing the value for the username key and also add an expiration date/time that already passed. This date is arbitrary and can any date/time in the past.
Add the below to the handleLogout function:
const handleLogout = () => {
  document.cookie = "username= ; expires = Thu, 01 Jan 1970 00:00:00 GMT"
  setUser('')
}
We delete cookies by clearing the value for the username key and also add an expiration date/time that already passed. This date is arbitrary and can any date/time in the past.
Our App.jsx file should now include the below completed component:
function App() {

  const [user, setUser] = useState('')

  useEffect(() => {
    const cookies = document.cookie.split('; ').map(cookie => cookie.split('='))

    const userCookie = cookies.filter(cookie => cookie[0] === 'username')

    if (userCookie.length) setUser(userCookie[0][1])
  },[])

  const handleLogin = () => {
    // Retrieve Google Authentication url from the server
    const url = (await axios.get('api/redirectUrl')).data

    // Redirect to the Google Authentication page
    window.location.href = url
  }

  const handleLogout = () => {
    document.cookie = "username= ; expires = Thu, 01 Jan 1970 00:00:00 GMT"
    setUser('')
  }

  return (
    <>
      <h1>OAuth Setup Tutorial</h1>
      {!user ?
        <button className='loginButton' onClick={handleLogin}>
          <img className='logo' src='./GoogleLogo.svg.png'/>
          Log In With Google
        </button>
        :
        <>
          <h2>Welcome Back {user}</h2>
          <button className='logoutButton' onClick={handleLogout}>Logout</button>
        </>
      }
    </>
  )
}
Recap
Now that we’re all set up, you should be able to log in and log out of the application using Google OAuth as shown below:
Next Steps
It is important to note that this was a basic introduction to adding OAuth into your application. Most applications will require a far more complex setup to manage users and their data within the application. Keep an eye out for my next article(s) which will take a much deeper dive into setting up our own secure login that utilizes OAuth but will allow for persisted login, protected routes for retrieving data specific to the user, and even being able to consolidate OAuth authorization from multiple sources yet logging in as one user.
If you found this article useful and would like to see more, please feel free to reach out with questions and content suggestions.